Thursday, October 14, 2021

Lucky 13 - All Grown Up

It has been so long since I have blogged that it just took me about 20 minutes to try and remember how to post a new blog post. With that said, it is time my beloved geese.

13 years ago, I quit my "day job" as a pediatric nurse to be home with my daughter as her immune system wasn't syncing well with daycare, my job and my husband's crazy residency schedule. I turned my love of sewing and children's clothing into what is now referred to as a side-hustle. What started out as custom orders for friends and friends of friends, quickly turned into a small children's clothing line and with the birth of kiddo #2, then transitioned into the world of PDF patterns. It was a crazy ride, and I met some amazing people, learned so very much about how to run a business and watched myself struggle too often with not being able to set boundaries for myself. But overall, what a ride it was.

You see, I am using past-tense here. Because after 13 years, brownie-goose is in the past. I haven't designed a new pattern in years. I have NO clue what trends are out there in children's clothing right now. Do I still sew? Absolutely. Do I still buy too much fabric? Guilty as charged. And I always will because I love it so very much, but my days as a pattern designer are done. 

Because 13 years ago, this fiery, squishy, pink-loving girl inspired me to do what I did.

Now, that beautiful girl is still oh so fiery, but she is also grown up and choosing her own clothes and being her own person. Don't get me wrong, she still inspires me on a daily basis, but in so many other ways. And if we can all be honest here as moms, we all know between her and my son, I spend more time behind the wheel of my car driving to and fro all of the things than I do behind my sewing machine.

So, with that said, I am hanging up my hat as Mother Goose. I am so very grateful to all of you for your support, friendship, love, communication, etc. over the years. I always said I was so lucky to have the best fans, customers, clients and friends out there, and I still believe that is true. So with that, I will go out on my Lucky 13. 

I will keep my Etsy shop open through the end of October, but will be putting it on permanent vacation mode after that.

As always, happy sewing and creating.

XOXO - Amy

Wednesday, October 26, 2016

Tilly Flounce Sleeve Sew Along Day 2

Welcome back ladies! Day 2 we will finish up our fun new Tillys and learn a little something new on how to make a flounce sleeve from any sleeve pattern! The possibilities just became endless. Now, if you are just joining me, click over to Day 1 to catch up and get in the know. :)

Yesterday we left off with the bodice almost finished save the buttons and sleeve hems. To begin Day 2, let's get to the hemming of the sleeves. Personally, I feel a flounce sleeve is best finished off with a bias tape hem. Now, don't go hating me and calling me bad words just yet, hear me out. I have 2 reasons I prefer this finish:
1. The beauty of the flounce sleeve is the way it is cut. Think about a circle skirt. The fabric just drapes beautifully because of the way it crosses the grain lines of the fabric with extra fullness at the base. The flounce sleeve is no different. The fabric becomes the magic here, and in my opinion, you have to add a little bit of weight to the bottom (ie. the hem) for that drape to happen properly, especially with a woven. Now, on a skirt it will drape anyways due to gravity, but a sleeve doesn't fall vertically, so we have to give it a little help. (That was your physics lesson for the day)
2. Second, again the shape of the flounce sleeve is swoon-worthy. But, it does have a downfall. Since it is a fuller sleeve (but only at the base) it will flounce around (giving its name justice) and you will see the inside of the sleeve. So, when you finish it off with bias tape, if you get a peek at the inside, it will be just as beautiful as the outside. You may think I am nuts considering I  have exposed seams on the inside and here I am worrying about a sleeve hem, but trust me here. 

All in all, the devil is in the details. ;)

So, now that you know the methods to my madness, let's get started. I have done a mini-tutorial on how to make your own bias tape. If you already now how, just skip on down. Or, if you buy pre-packaged (there is NO shame in this game, but I would go for the single fold) just keep scrolling until we attach it. If you are feeling rebellious and just want to hem your sleeve as normal, that is fine too. The sleeve I drafted has a 3/8" seam allowance included for the hem, not huge...but you can do it. We are still friends and you know I don't judge (said the girl with exposed seams). ;)

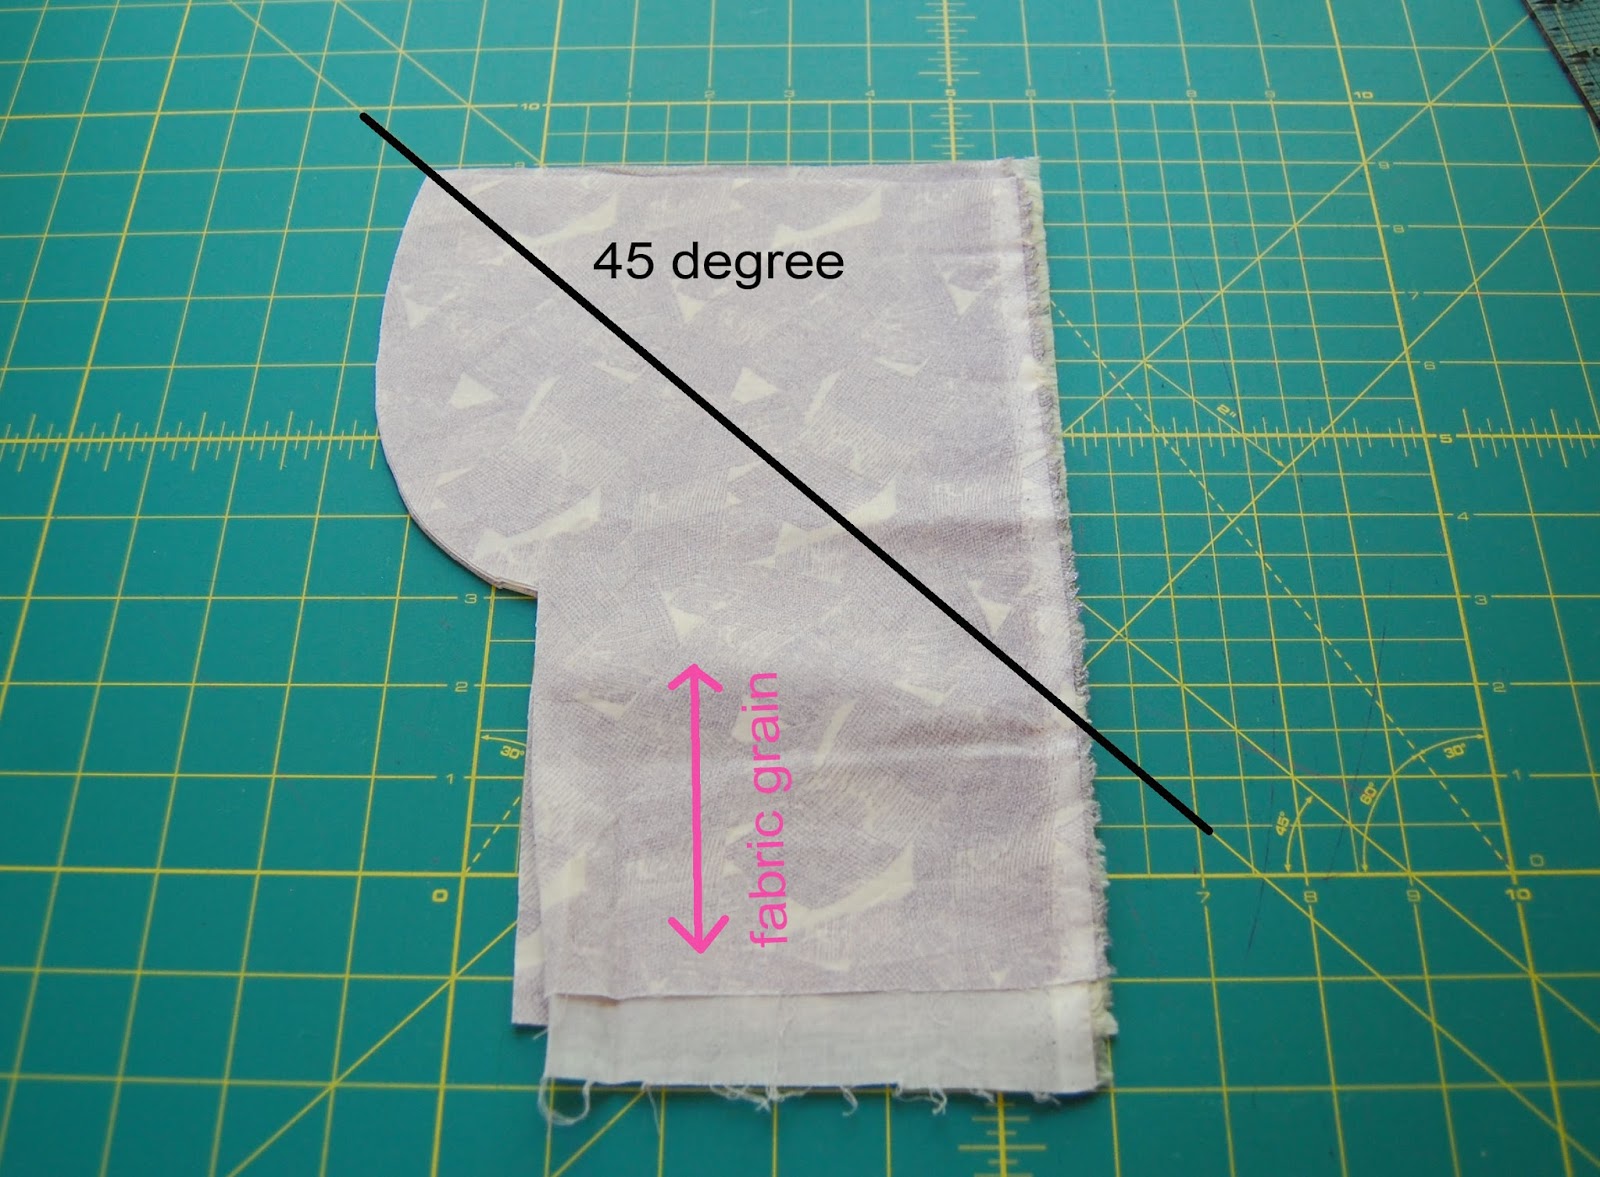
I pretty much always will pull bias tape off the scraps of whatever fabric I am going to use. It is no secret that cutting fabric on the bias can be a huge fabric-sucker, but it is so important to give it the ability to curve and lay how it should. I won't go too much into detail here, but when you cut fabric on the bias, you will realize that the fabric has a lot more give than it does on the grain. It also won't fray. Neat little tidbit here on a Wednesday morning. So, you want to start by establishing a 45 degree angle to your fabric grain lines as shown below. If you have a cutting board with your bias lines on it (as I do below), use them to your benefit. Line up the grain of your fabric with the lines on your board, and follow the 45 degree bias line as represented by the black line below. Once you have that angle, make a slice across the fabric. If you can see here, I am cutting 4 pieces of scrap (from where I cut the bodice) at the same time to maximize the amount of strips I have with minimal cuts.


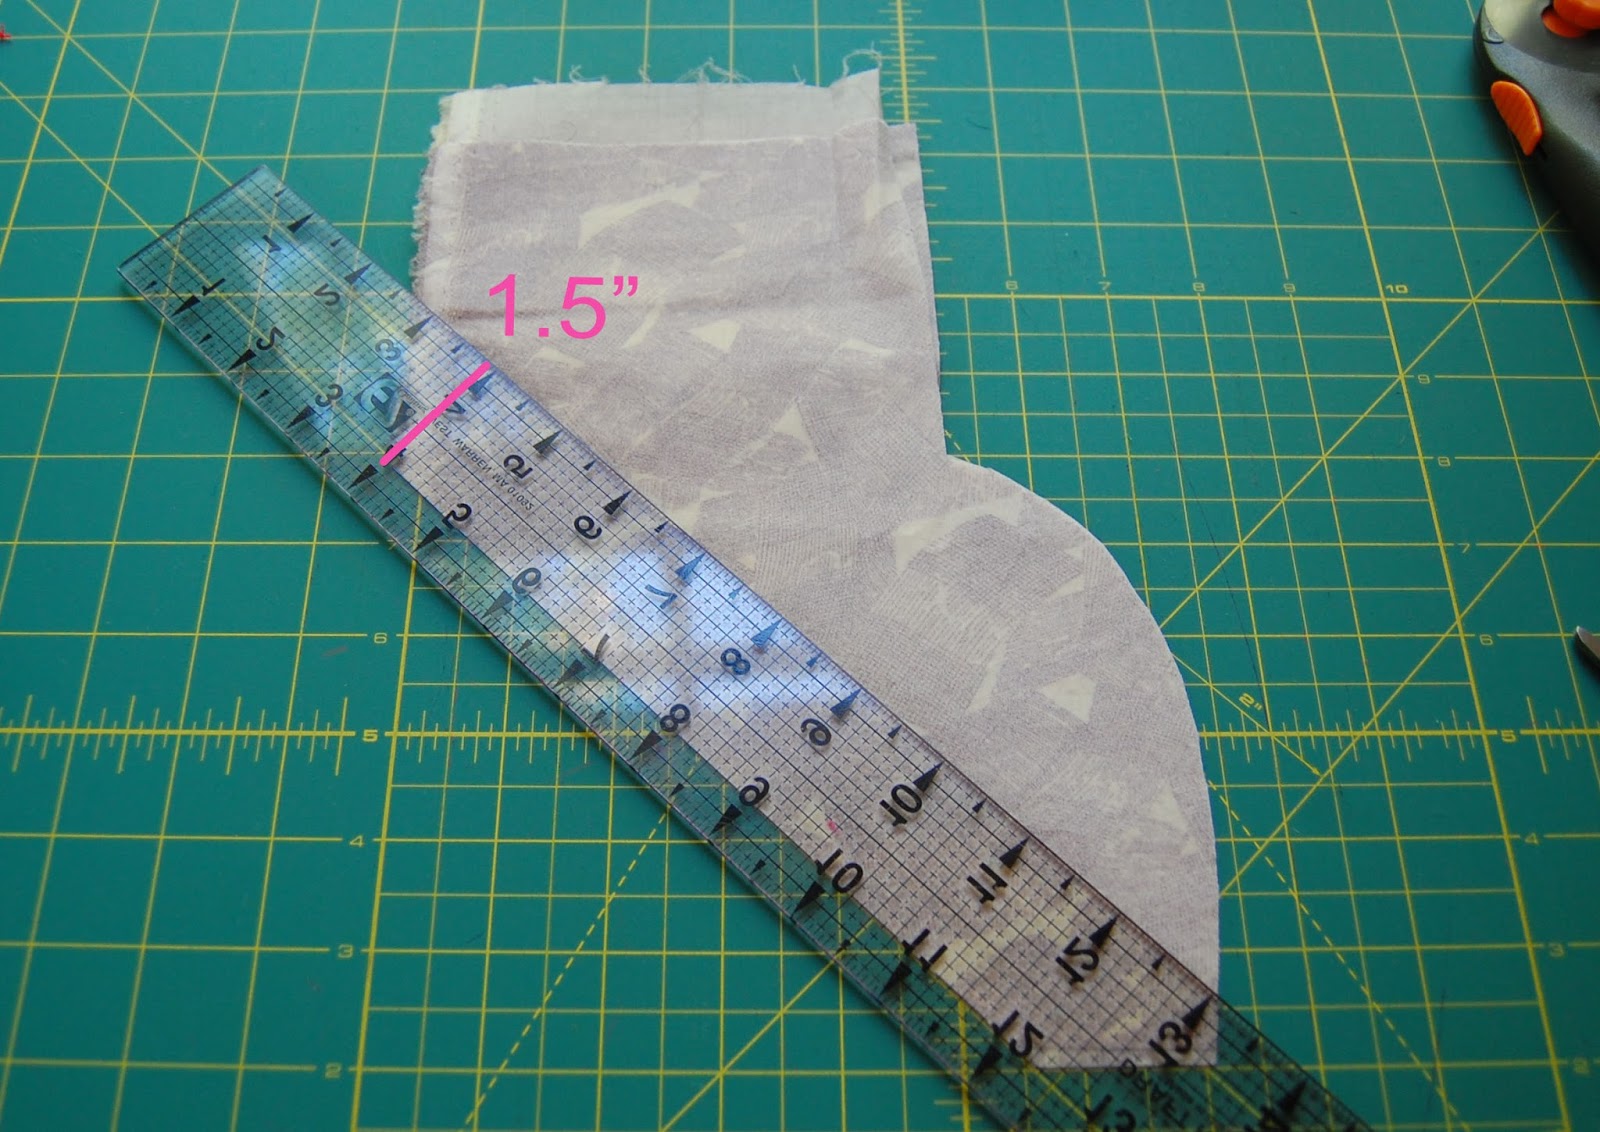
Once your angled cut is made, flip your fabric around (I do this to make the cuts easier for me being right-handed) and cut strips that are 1.5" wide. Cut as many as you can out of your scraps.


 Once you have your scraps, it is time to join them together. You will line 2 scraps up, right sides together as shown below. To attach them, you will sew them together at a 45 degree angle as shown by the black line below. Do this until you have one long piece of bias tape (I usually do about 6-8 strips, enough to cover the circumference of both sleeve hems, real rocket science here as you can tell). 


Once all the strips are sewn together, clip the seam allowances as shown below. The black dotted line is my seam line. 


Now, take to the iron and press all of the seams out.


 Once the seams are pressed, go along the strips and cut off all the excess points as shown below.


Last step. Grab your handy bias strip maker (if you have one, if not I highly recommend you ask Santa for a few, I use mine often) and press the raw edges into the center as shown below. You will leave it as a single fold, instead of folding the bias in on itself again. And see, bias is done. If you had good tunes I bet that went quicker than you planned. If that was your first time, add another skill to your set! 


Now to put that bias to work. I usually will just make sure that I have enough bias tape to hem both sleeves before I get started. No one has time to start only to realize they need more bias tape. Once you have made sure you have plenty, head over to your machine with your bias tape and your bodice. We are going to be sewing the bias to the RIGHT side of the sleeve. Find your sleeve seam, and put the edge of your bias tape along it, making sure to open one fold of the bias so that the raw edge lines up with the raw edge of your sleeve, right sides together. Now, you will not start stitching the tape to the sleeve at the sleeve seam, instead, bump it down about 1" or so and start sewing there. The photo below shows this with the purple x.


As you stitch, stay within the fold of your bias tape. Since your tape was a 1.5" strip, this should be lining up perfectly with a 3/8" seam allowance.


Keep stitching all the way around the bottom of the sleeve, but slow down as you come back around to the sleeve seam. Below, again the purple x is where I started my stitch.


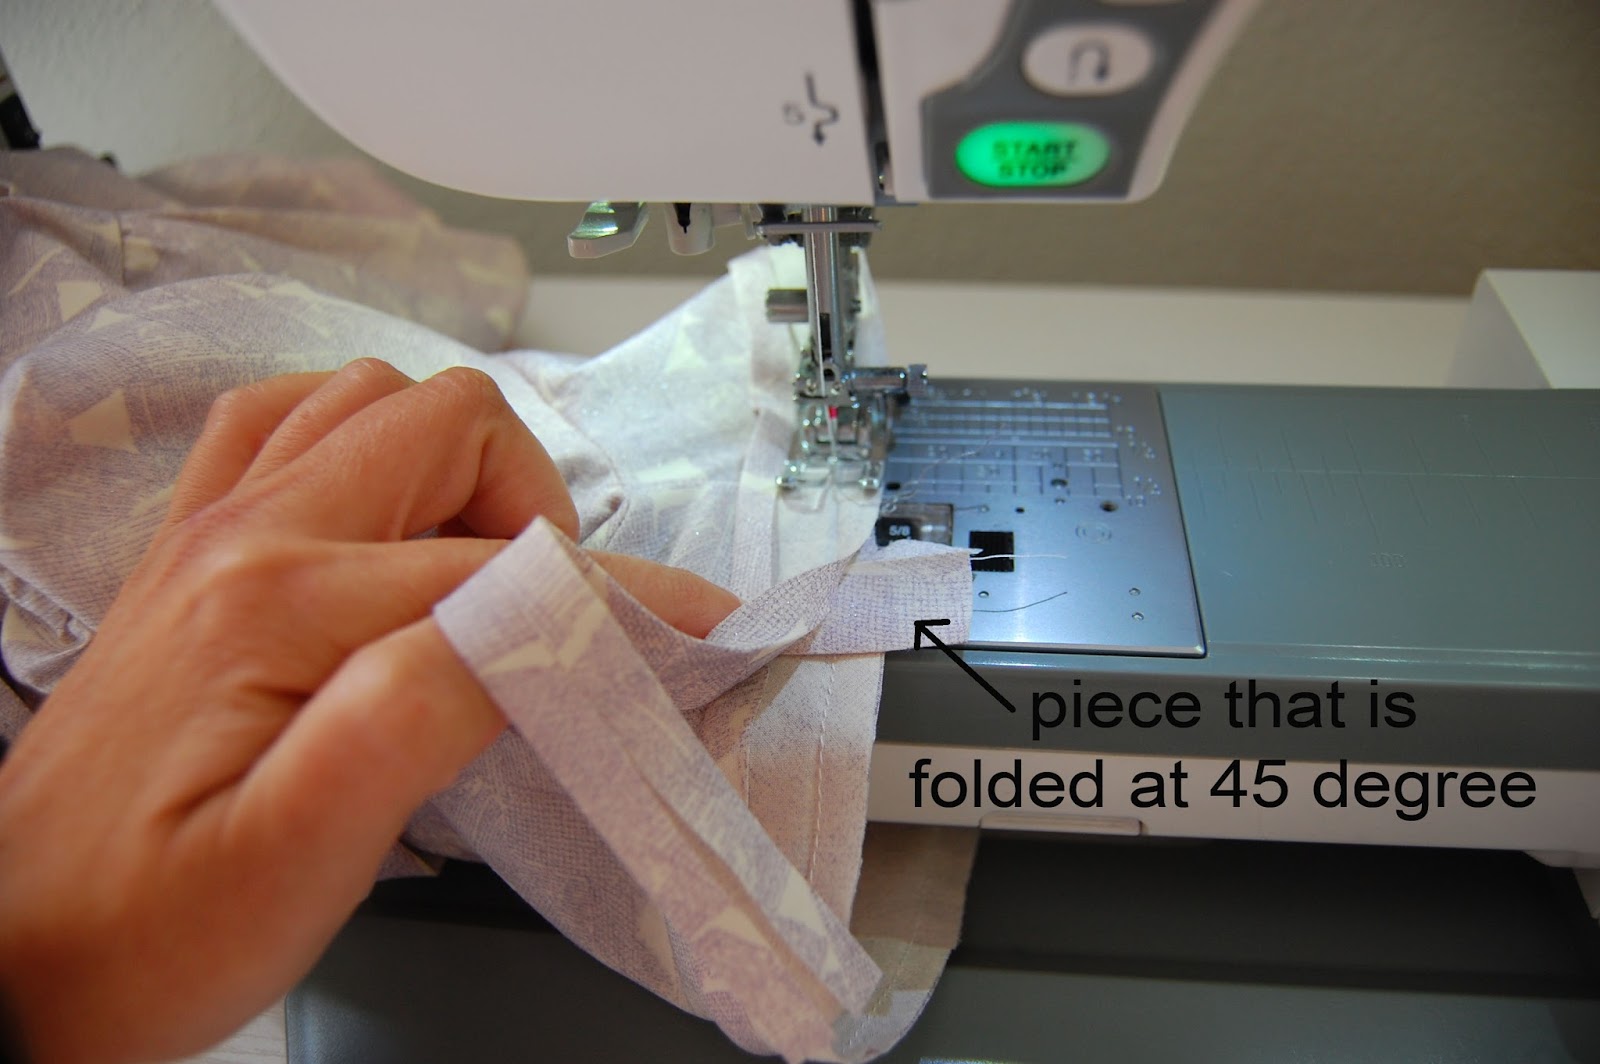
 I usually leave my needle down right as I pass over the sleeve seam. Grab the edge of your bias tape that you started with, and fold it down at a 45 degree angle as shown below. This is why we left that 1" gap with no stitching when we started.


 Once folded over, place the other end of bias (the one you are currently stitching down) over the edge you just folded at an angle, making sure to keep the raw edges in line with the sleeve.


You will continue stitching just as you have been, OVER the edge you folded and about an inch more, as shown below with the black arrow. The yellow dashed line represents the edge you folded.


 Once stitched, cut the excess of your bias tape as shown below with the black line. 


 Now, take over to the ironing board and press the bias tape over the seam allowance and press towards the bottom of the sleeve as shown by the arrow below.


 This is what it should look like where you folded the starting edge at an angle. See how it gives you a nice finished edge?


 Now, flip the sleeve inside out and press the bias tape to the inside of the sleeve along the line you just stitched.


 This picture shows once it has been folded in and how you can just barely see the seam line.


 As you press all along the hem, you will come to the point where your edge was folded. Again, this makes for a nice, finished and pretty hem.


 Once pressed, take to the machine and stitch the hem. I love this finish as well because it gives the appearance of a nice, wide hem on the outside, yet the inside is just as beautiful!


Repeat with the other strip of bias and sleeve and then get ready to call it a day with the bodice! I am a creature of habit and like to have the bodice finished before I go to the skirt, so I go ahead and stitch my buttons on at this point as well. I didn't take photos of this, because I figured if you are used to BG patterns, buttons are a common task that you can probably all do in your sleep by now!

Now to the skirt!! We made changes to the bodice as far as dropping the bodice and shaping it, so our skirt needs to reflect that. I hope you remembered the numbers from yesterday that we added to the bodice, as they are important now. I am just glad mine are in writing as I have already forgotten them. Ha! Now, this next step may be overkill, especially since BG designs are made in vintage lengths (read as short dresses) but as you know, I always sometimes every now and then am crazy about like details. So, since I added length to the bodice, I need to take that amount away from my skirt piece. However, the only number I am going to be concerned with right now is the amount I added to the center, which in my case was 1.25". So, I am going to take that amount away from the skirt piece I cut. So, since I am making a 4-5 top here, the cutting chart on page 8 of the pattern tutorial says I should cut 2 pieces that are 11.25" in length. But I won't. Instead, I will cut 2 pieces that are 10" in length. Since you know I love equations, here we go:

Skirt length according to size on page 8 - Amount added to center of bodice = New length to cut skirt pieces

In my case: 11.25 - 1.25 = 10

Okay, hopefully we are all on the same page. Math homework at my house lately (I love math like another child but my Lou doesn't share the same emotions for it, sigh) has been so rough, I am afraid one day in my patterns I will follow up to what Lou accuses me of..."Ugh you're making this so much harder than it should be!" Don't get me started on 9 year old hormones/attitudes this morning.

 Once your skirt pieces are cut, lay them out flat, but on the fold. We have one more modification to make to them. Now, to use the other measurement from our bodice, the one we added to the exterior. Mine was 2.5", so I am going to measure down 2.5" on the cut sides of my skirt piece (NOT THE FOLD SIDE) and make a mark. I have both of my skirt pieces stacked here on the fold to make the process quicker.


 Now, you are going to draw a line that is similar to the curve of your bodice from the fold of your skirt pieces to the mark you just made from the exterior bodice drop. Dropbox has eaten the photo I did of that step, so instead below I have shown you what mine looks like once it is cut, and the yellow dashed line represents where the straight lines of the skirt pieces used to be. This doesn't have to be perfect, but you do need to mirror the curve shape the best you can.


 Once you are happy with the curve, put skirt pieces right sides together and sew along the edges as shown by the black lines below. Finish those seams and then sew 2 gathering stitches along the top, curved part of the skirt piece. You will sew the gathering stitches for the front and back skirt pieces separately to make it easier to gather in the round in just a bit.


 Now, place your skirt wrong sides out on a flat surface, and slide your bodice, right sides out up into the skirt as shown below. You will then match up and pin together the skirt side seams with the bodice and the front center of the bodice with the front center or the skirt and then the back center of the bodice with the back center of the skirt.


 Once you have it all pinned in those 4 spots, pull the skirt fabric along the gathering stitches to fit the bodice and pin in place as you go. Below is what it will look like when finished. Stitch the skirt to the bodice and then finish that seam. 


Press the skirt seam up towards the bodice and top-stitch now if you please. Hem the bottom of your skirt according to the instructions in the pattern tutorial and guess what???

YOU ARE DONE! Congrats to you for an awesome Tilly hack. I cannot wait to see what everyone creates, so make sure to share your Tilly Flounces in the brownie-goose lovers group on Facebook


And now for a mini-tutorial that just might make you dangerous in the sewing room. ;) I am going to walk you though the steps that you will need to turn any sleeve into a flounce

Start off with whatever sleeve you choose and have it cut out on tracing paper, or regular paper, pick your poison. Y'all know how I love my tracing paper. I am showing this tutorial on a sleeve drafted on the fold. This certainly works on sleeves not on the fold as well.


 First step, measure 1/2" off the fold and make a mark parallel with the fold. (Now, if you have a sleeve not on the fold, make the marks off the center of the sleeve cap.) Once that line is drawn, measure over 1" now and make a line parallel to the fold. Continue along this path until you have run out of space on your sleeve.


 Now, with scissors you are going to cut along those lines. Start at the bottom of your sleeve and cut up to BUT NOT THROUGH the sleeve cap. I usually will leave a space of 1/8" between the sleeve cap and my cut. This is the slashing part.


 See how I have cut along the lines, but the sleeve is still together at the cap? This is the beauty of it. It keeps the sleeve cap the same but allows us to change the shape of the sleeve. I love things like this.


 Now, grab another piece of paper or tracing paper, and tape your cut sleeve down to the paper at the top and bottom of the fold line as shown by the arrows below.


Time for the spreading part. Since the fold of your sleeve is taped in place, position the next piece so that there is a 1" gap between the pieces at the bottom as shown below. Once you have it positioned just right, tape it in place.


 Continue along this method, making the 1" spaces and taping the sleeve in place. Depending on the height of your sleeve cap, you may have to do some maneuvering to keep it laying flat, but do not let that stress you. Now, if you want more of a flounce, make your spaces more than 1" and less of a flounce would be less than 1". For me, I found 1" was the magic number with the Tilly although feel free to play around with it all!


Once you have all of your pieces spaced and taped, trace along the outer edges of your new sleeve.


 Cut along those lines and see how you have a brand new flounce sleeve!!


Say you want to shorten that sleeve. All you would do is decide how much you wanted off the hem and measure up that amount (below I showed 2") all along the bottom of the sleeve and then cut along the line. 


Now ladies you are armed and dangerous in the sewing room. Go get crazy with some hacks and flounces! Let your creativity flow!!

Thanks again for following along and being patient in the process! The holiday season is about to get started and so I hope each and everyone of you has one full of good memories, happiness, fun and family!

Xoxo - Amy

Tuesday, October 25, 2016

Tilly Flounce Sleeve Add-On Sew Along

Good gravy...I haven't blogged in forever. My goodness. This past year I have made the decision to shift BG from a business to more of a hobby-business as I have put some other things on my plate, and my lack of blog presence shows just that! But, here's hoping this can make up for the absence. 

The Tilly. What can't she do? I have seen you ladies make some amazing creations with her as the base. You never cease to amaze me. But if I had a dollar for every time someone asked me for a sleeve for the Tilly, I may not be driving my ancient Honda anymore. Well, I love that car, so I probably would but you know what I mean. ;) 

I have a folder on my computer filled of dress ideas that Louisa likes (the older she gets the less she loves wearing what I make, sigh...I knew it was coming and I am just grateful she was compliant for as long as she was) and this was one she picked out for a dress for my cousin's wedding in September. (This picture is from Zulily, I am so sorry I do not have the brand...and I tried to reverse search it to no luck, so if someone knows - fill me in!) 


In looking at it, I saw Tilly...with a sleeve modification and dropped, curved bodice. So, I got out my drafting paper and went to work. And this is what the result was. I was instantly in love, and so was Lou. Winner, winner chicken dinner.


And as I saw how awesome this sleeve paired with Tilly, I decided I would finally cave to all of you. I mean, you had been so patient!! So, I drafted a sleeve for each size of the Tilly and modified the armsyce to provide as well. It was the least I could do for awesome geese. XOXO

Now to get down to business for the sew along. For those that do not have the Tilly pattern yet, it is on sale for 50% off in my Etsy store right now and will be through the rest of the week. If this week is crazy for you and there is no way you can get to your sewing room, do not stress! As with all of my sew alongs/hacks and tutorials they are ALWAYS available here on the blog if you click one of the tabs on the menu up top. If you are new to a BG sew along, welcome!! What I like to do is a mini tutorial that goes in conjunction with the tutorial included with the pattern so you can get as much use from your BG patterns as you can. I love to offer diversity in my patterns to save money, but also to help you broaden your skill base! I am an absolute nerd when it comes to sewing and believe you cannot ever learn it all so I love walking into my sewing room each day knowing I will try a new skill. And with this sew along I did. I know feel confident with the slash and spread method and actually will include a mini tutorial at the end to show you how to use this method on any sleeve! I am always amazed at how the smallest lessons in the sewing room can lead to some of the biggest changes.

SIDE NOTE: this modification will work with all 3 views of the Tilly, however I have written the tutorial following View C with the closed back.

Welcome to day 1. Today we will make the necessary changes needed to the bodice of the pattern for this hack and then construct the bodice. Tomorrow we will hem the sleeve with bias tape, finish the top/dress and then I will do the mini-tutorial on how to make any sleeve a flounce sleeve. 

Enough talk. Let's get down to business. Here is a link for the file that contains the sleeve and the modified armsyce. https://drive.google.com/open?id=0B8RLfeP2eFAyRXFUR3dyN0U5amM 
This is what it should look like all printed out and taped together. (I totally forgot to add the grain line arrow on the sleeve, but it runs parallel with the fold of the sleeve)


Now, you may be wondering why there is a modified armsyce. There is a method to my madness. When you have a sleeveless dress (like the original Tilly) it is drafted so that the armsyce (arm curve) comes closer to the underarm so there is no major gap. Well, when you add a sleeve, you need to allow a bit more of a drop (meaning farther down from the underarm) so that there is more room for movement with the sleeve. I usually use 1/2" to either drop the arm when adding a sleeve, or raising it to make something sleeveless. While it doesn't seem like a ton, it does make a difference. There are other adjustments that technically should be made in making a sleeveless dress have sleeves, but thankfully this sweet flounce sleeve has a lot of forgiveness to its shape. So, there is the method. Basically your little girls underarm will thank you and no seams will be ripped on the playground. 

So, first things first. Let's redraft our Tilly bodice for this modification. I like to use tracing paper for this so that I can see the original Tilly and still make changes. This is what I buy, and I usually buy it by the bolt when it is 50% off to use for all patterns when I draft and when I trace the sizes http://www.joann.com/pellon-interfacing-tracing-material-pattern-white/1540640.html#q=pellon%2B830&start=1

Trace the size you need for the modified armsyce. The ONLY thing that has changed here is the curve of the arm. The F and B will help you to line up the front and the back of your original Tilly bodice. 


Now, trace the size you need from the original Tilly. It matters none if you start with front or back. Place it on top of the modified armscye, lining up the shoulder, side and also the mark for the front or back, depending on which one you are using. Again, the ONLY thing that is different is the curve of the arm. Once you have it all lined up, trace the modified armsyce (shown below in blue) on your original Tilly bodice. See how it is dropped 1/2"?


Shown below is my modified bodice front with the dropped curve. The black arrow points to the old arm curve.


Okay, I debated on adding this photo or not, so IT IS NOT MANDATORY but personally, I like to kick out my arm curve just a bit (as shown below in the red) so that the sleeve falls more in line with the edge of the shoulder. I have done the Tilly with a flounce without doing this and it was fine. So, do not fret or feel you need to, it is totally personal preference. 


The armsyce is now all done and ready for the sleeve. However, let's get to work on dropping the bodice and adding the curve that makes it so sweet. With your modified bodice get your ruler and trace down 1.25" from the bodice bottom along the fold (if you are working on the front first) or the center (if you are doing the back first). Then, on the side measure down 2.5". Now, you do not have to drop the bodice at all, you can carry on with the way the original bottom of the bodice looks with a flounce sleeve. You be the designer. I am working on a size 4-5 for reference. You can certainly play with how much you drop the bodice depending on your size. You may need to decrease the numbers for the smaller sizes and increase for the larger sizes. But remember your number as we will use it later!


Once you have those markings, draw a curve between them that mimics the one below. 


Once you have that done...you have your modified Tilly bodice all ready for a sew along! I have outlined the changes below in blue, and you can see the original bodice in the pencil marks for reference. Now, if you started on the front bodice, all you need to do now is make the changes for the back bodice (or if you started on the back, make the front changes). Easy peasy ladies!!


 Now that all of our drafting is done, it is time to cut and get down to sewing! Just as the original, you will cut 2 fronts on the fold (one will be lining), 2 sets mirror image of the back pieces (one will be lining) and 2 sleeves on the fold. HOLD OFF on the skirt for now. 

With right sides together, line up the front and back bodice pieces and sew the shoulder seams closed (just as in the pattern, the seam allowance is 3/8") as shown below. Do this for both the outer and lining. Once sewn, take to the iron and press the seams out.


Now lay the lining on top of the outer, with right sides facing making sure to line up shoulder seams, sides and arms as shown below. Sew along the black dotted line. Now, for those of you that have sewn View C of the Tilly before you are probably wondering why we are sewing down the back seams. Well, confession...I am cheating. There will be no placket here. My reason being is that with the dropped bodice, there is more bodice opening and therefore it is easier to get on and off without the placket. However, you can certainly put the placket in if you prefer, just follow the directions as stated in the pattern. 


 Once sewn, clip into your corners as shown below in red. Now, I did not photograph this step, but I like to under stitch (this is where you stitch the seam allowance to the lining, I do this in the Lennon if you have that pattern, but if not here is a good tutorial, just substitute the lining for the facing https://www.craftsy.com/blog/2014/07/how-to-sew-understitching/) the bodice along the front neck and sides only to help when flipping it right sides out. I have also found that sometimes it helps my corners lay better.


 Flip the bodice right sides out and press along your seams. 


Now, this next step isn't mandatory, but depending on how unruly your fabric is, it may be helpful. Baste your armsyces together as shown below with the black dotted line. 


Yay for sleeve time!! Okay, if are trying to bust this out quickly, let me recommend that this is the one step you want to make sure to take your time on. I like to be efficient when I sew, which is I think some of the reasons I don't like to sew sleeves...because it forces me to slow down and use my pins. Confessions of an inpatient seamstress.

Fold your sleeve along the fold line and finger press along the top to mark your center. Now, with the way this sleeve is shaped it is easy to make the mistake and sew the wrong side to the armsyce. Trust me, I have done that before. A pretty flounce sleeve it does not make. So, make sure you have the sleeve cap versus the edge!


 Now, take the sleeve, and place it along the bodice, right sides together making sure to match up the center you just finger-pressed with the shoulder seam. Pin in place at this point.


 Here is the part to take your time. Grab a seat, put on some good tunes and get your pins ready. Ease the sleeve along the armsyce and pin, pin, pin. 


 I like to work from the center of the sleeve/shoulder seam down to the arm curve as shown below.


Now, if you get to a point in which you have more sleeve that armsyce, this is when you need to ease it in. See below how there is the gapping of the sleeve? Now, when I say ease I don't mean the traditional method of an ease-stitch here as this sleeve will have no gathers. I mean manipulating the fabric so that the sleeve fits in place. 


This was hard to take a  picture since it was only my at home at the time, but see how I have eased the sleeve in and there is no longer a gap? 


 Once you have your sleeve pinned until the cows come home, take over to the machine and stitch it to the bodice. Sew slowly and with precision here as many times the bodice fabric likes to jump into your stitches. Don't let it act a fool.

Now, let me address sleeve puckers from easing and manipulating the fabric. I had 2 on my first sleeve for this tutorial so they were perfect to use as examples! The first one is a pucker that starts at the seam and goes through the seam allowance. This is totally fine. It will no be seen from the right side and it is totally normal when you have fabric that is eased. 


 Now, this next pucker is the bad kind. If it extends through the seam into the sleeve, it needs to be ripped and re-eased. It will show on the sleeve and while it may be minute, it is such an easy, quick fix at this point so you might as well go ahead and remedy the situation. :)


Repeat with the other sleeve and armsyce. And when you have them sewn in, take the bodice over to the ironing board and press the seams TOWARD THE BODICE. Do not look closely at my photo below as my seams are pressed the wrong way. Do as I say, not as I do. I had to go back and rip seams and re-press. Once pressed, line up the bodice right sides together and sew up the sides and sleeves as shown below in black. Then, finish those seams.


 Alrighty, we are almost done with the bodice. Turn your bodice right sides out and press your side seams and admire those sleeves! Although, they aren't near as pretty on the cutting table as they are when worn! Now, if you want to top-stitch your bodice, go for it. This is also a good time to add any pretty trim that you may like. 


Since we are cheating and not adding a placket, I figure go big or go home...so we will also have exposed seams where the skirt meets the bodice. Who's feeling rebellious? To make things easier and cut down on the amount of underarm sweating that may be done with the automatic buttonhole function on the machine, let's go ahead and add those now. With the back of the Tilly facing up, line up the side seams and overlap the back pieces. It matters none which side is on top, I usually pick the side that looks best. Then, place buttons as you would like (remembering there will be a 3/8" seam along the bottom) and mark where to make your buttonholes. Then, take to the machine and make your buttonholes on a wide open bodice. Some of the easiest buttonholes to do!!


Once sewn, put your Tilly on a flat surface again with the back facing up and overlap your back pieces again. Open up the buttonholes and make marks where the buttons need to be. Then, sew a basting stitch along the bottom to secure the back pieces in place as shown below with the black line. I like to place a ruler between the front and back of the bodice so that I don't accidentally sew the front to the back.


 Okay ladies. That is all the work we are going to do for the day. Tomorrow we will start the day making bias tape to finish our sleeve hems (don't shoot me...I personally feel they are best finished that way) and then adding the skirt to our new Tilly.  Oh and I will get rowdy and show you how to slash and spread your way to a flounce sleeve. Getting crazy up in here girls. ;)