Showing posts with label lazy susan sew along. Show all posts

Thursday, July 25, 2013

lazy susan in knit sew along - day 4

okay ladies...here we are, last and final day! i have heard from  many of you that you are still waiting on knit fabric to come in. while that makes me sad - it also makes me excited that there are still more pictures to come to see what you create!

if you are just now joining in, flip back a few posts to see what all we have been up to this week!

so, the task at hand today is quite possibly my fave part...the DETAILS. i am a sucker for a detail. yes, it takes more time...but if you have noticed, i tend to incorporate them as often as i can. in my opinion, this is the area that you can put your spin on it. this is the time to make it yours. i had a girl tell me one time that she could always tell something i made because there were at least 2 buttons on it somewhere. :) she is right, the girl behind BG has a thing for buttons and my sweet button lady michele at little red cottage keeps me in supply!

first let's talk buttons. buttons are my fave because i feel this is the opportunity to add a splash of color that you may not necessarily find in any of your fabrics, but once added...the color brings all the fabrics together. that was my case here with these shoulder buttons. i felt like the bodice needed more color to balance out all of the vibrant shades on the skirt.
 and then for this dress - i thought the bodice looked naked. it needed something, not much, but just a little extra. and since i knew i had these gorgeous rust pinwheel buttons, i pinned them in place (they are still pinned in place on my dress form, and might actually get sew on in a few months, haha) and voila. the bodice was no longer naked.
now, i will say the one thing you have to be careful with buttons is their weight. especially if you have a gorgeous vintage button (they tend to be heavier) and a thinner knit, that button is going to weigh it down and cause the knit to pull. you certainly don't want that...not even in the name of fashion!

now that we have our buttons covered, let's move right along to my second fave detail. a pocket. pockets are great for a number of reasons, but my fave is that they are great scrap-busters. i have a rule in my sewing room, i NEVER cut a pocket from yardage. when it is time to construct, i grab my scraps and see what i have available. it works for me because it gives me a wider variety of fabrics to go from and helps to cut down on my scraps that i hoard have laying around.

NOTE: i do not recommend adding a pocket on a knit skirt. the weight is too much for the knit and will weight it down/pull the fabric and make it wonky. but if you have a woven skirt...go for the pocket!

there are some awesome pocket tutorials out there on the internet. not kidding. but i will show you here how to make one of my tried and true faves. this guy right here:
 now i am sure it will not surprise you when i tell you this isn't rocket science. :) it really isn't. the rule to a pocket is that if works for the dress and makes you smile, go for it. this one makes me smile. 

draw a rectangle that is 5.25" tall by 5" wide. then on the bottom of the rectangle make a mark that is 2.5" to the left of the right side of the rectangle. 
now, this is the part that isn't rocket science. you will draw a curved line from the top left of the rectangle to the bottom right making sure to square it off around that 2.5" mark as shown above. what i do is make a bunch of marks on the curve and then cut along the middle. does that make sense?? 

once you have your curve how you want it, you are done with pocket pattern construction. the right side of the rectangle has now become your fold line and so for each pocket - you want to cut 2 on the fold.
 now put your 2 pieces right sides together and sew along the curve.
clip your curve and flip right sides out and press. you should now have something that looks like this.
 run a gathering stitch along the top of the pocket and then gather it in to your liking. i like to gather until it has just a little bit of a poof and a slight curve at the top.
 to top off your pocket - i like to go with a piece of knit so that i can leave the edge unfinished and let it curl up to give it a bit more character. however, i will also show you how to do it if you don't have a knit to use or if you want a more finished look.

grab a scrap piece of fabric that is about an inch longer on each side than the gathered edge of your pocket. for this pocket, my piece is 2" wide but this all depends on what you want.
for a finished edge: place your strip right sides together on your pocket about 1/2" down from the top. i usually just line it up under my gathering stitch. no rhyme or reason! pin in place and sew along the edge of your strip.
now, flip the strip up and press along the seam. you can now fold the strip all the way over to the wrong side and then go and top-stitch in place.
 for a raw edge: press your strip in half lengthwise.
 now, place the raw edge of your pocket into the middle seam of your strip.
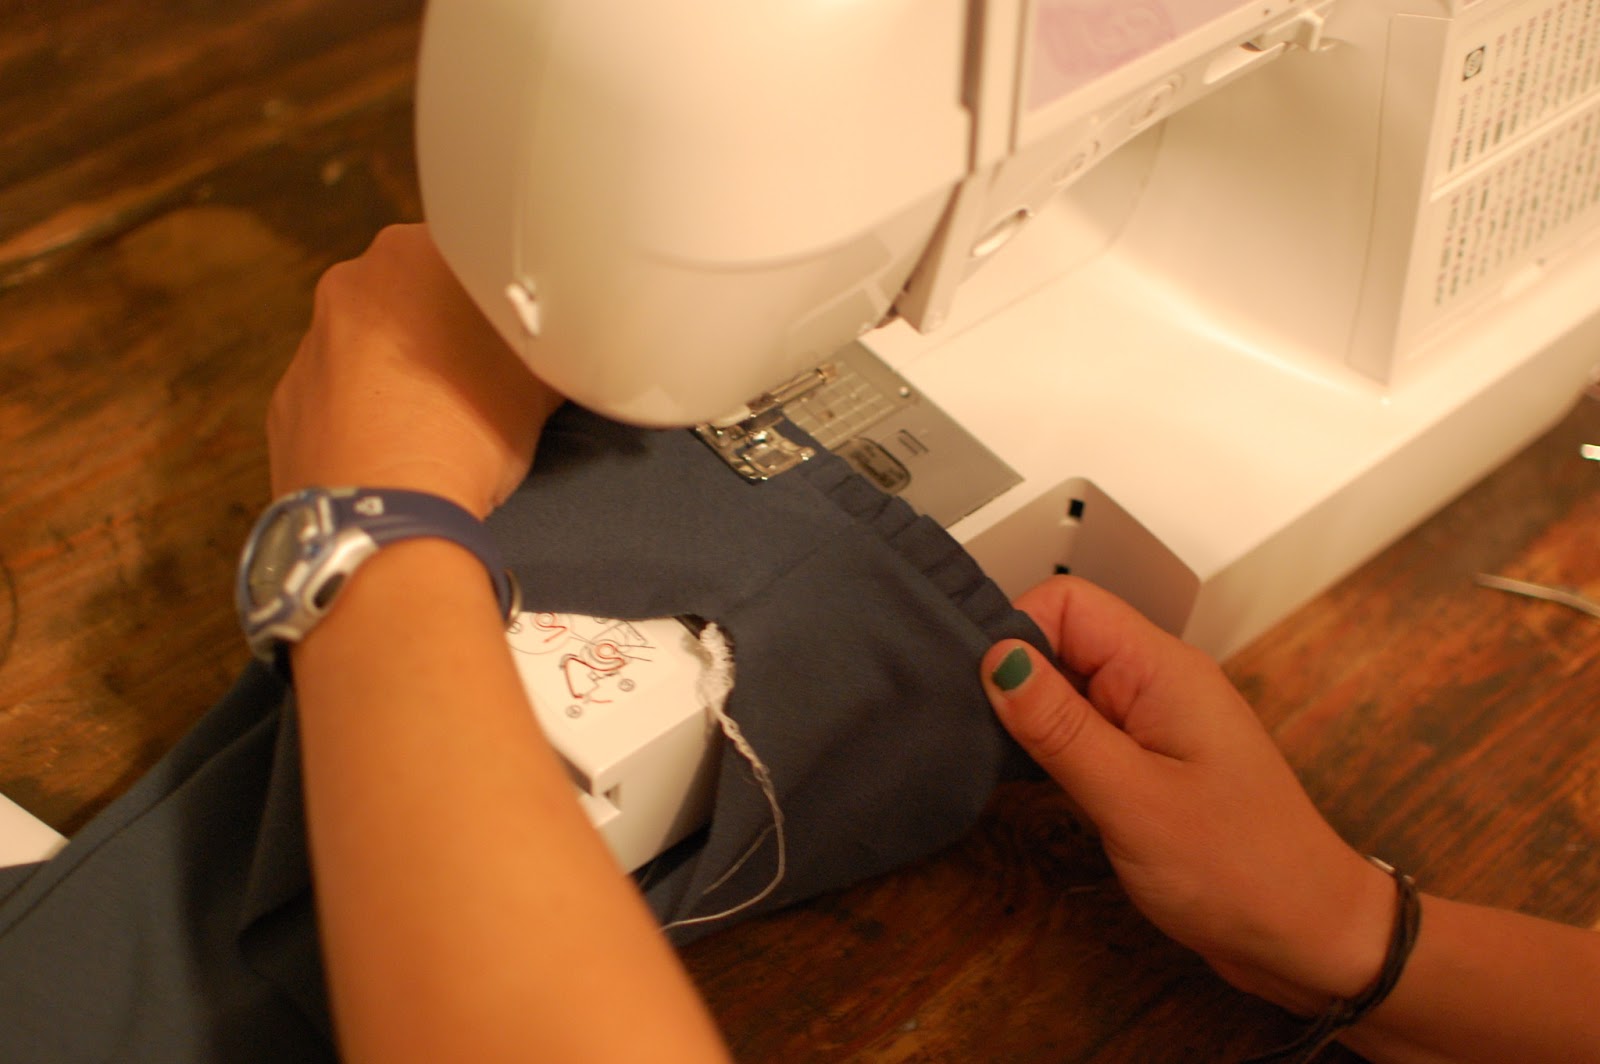
fold the strip down and pin in place and sew along the edge of the knit as shown below.
take your pocket to the iron and press down the leftover sides of your top strip so that it is flush with the finished edge of your pocket.
 i like to go ahead and secure these side flaps down with a top-stitch.
 this is a better photo of how the knit will flip up on the raw edge of the pocket.
 once that is done, grab a big ole button to put on the pocket if that strikes your fancy, or dress up the edges with rick-rack OR just leave it as is. :) place your skirt on a flat surface and determine placement by giving it the good eyeball and pin in place and sew it down and guess what...

 we are DONE with the lazy susan in knit sew along! i hope you ladies have enjoyed this week and i hope you are more comfortable sewing with knits. more than anything, i cannot wait to see all the awesome you create! don't forget to share your photos in the brownie-goose lovers group on facebook

until next time my geese...

Wednesday, July 24, 2013

lazy susan in knit sew along - day 3

sew along objective (yeah, i just did that...i promise i wont bust out an outline): to take your bodice from the lazy susan pattern and learn how to construct it out of knit fabric for a more versatile pattern.

wednesday july 24 - attaching skirts to bodice: i will be going over attaching a gathered woven OR knit skirt to the knit bodice and also how to attach a paper bag style skirt to your knit bodice. whew...busy day!

welcome back ladies! if you are just now joining us, check out this blog to learn about the sew along, and then check out day 1 and day 2 to see what we are up to.

alright - BEFORE you go cutting. listen to this very important piece of information. these sew alongs work just like my patterns. please read through to the end of the post before you do anything. i promise it will help things to go smoother and make more sense!
 
let's first go over some tips for sewing the skirt in a knit. you basically are going to do it the same as you did with a woven in the pattern, but i am going to point out some helpful tips that will make sewing with knit more of a pleasure. read: decrease the amount of swearing, temper tantrums and tears.

my first secret weapon:
 i do not sew knits without this stuff. lightweight fusible interfacing with stretch. it will make such a difference, especially when dealing with a thinner knit! you can buy this on a bolt as well, i just happened to luck up at wal-mart a few years ago and they had the bags on clearance for $0.33 and i hoarded stocked up. i use this when i go to hem a lightweight knit, since it keeps it from rolling. it basically gives the knit a little bulk, while maintaining the stretch, so it makes it easier to work with.

NOTE: although you sized down in your knit bodice, when going to cut the skirt make sure to cut the length for the size your child normally wears, NOT sizing down.

what i do is cut 2" sections to place around the bottom of my knit skirt piece. i like to hem about 1" with knit just to give it some extra weight so that it hangs better and doesn't flip up. now, in the pattern i have only allowed for a 1/2" hem, so you want to make sure to add a bit of length if you are going to be doing a larger hem.

NOTE: also, if you chose to do a drop waist on the bodice, you need to account for that when cutting the pieces for your skirt. the easiest way that i have found is to subtract whatever you added to your bodice from the skirt measurement. so, since i added 3.5" to my bodice yesterday, i am just going to take 3.5" off the length of my skirt. :)

here are my pieces of interfacing all cut and ready to be fused. 
now, take your knit and your interfacing over to the iron and you want to place the fusible side (usually it is bumpier) on the WRONG side of the bottom of your skirt fabric lining up the bottom edge. MAKE SURE THE STRETCH OF YOUR INTERFACING RUNS WITH THE STRETCH OF YOUR FABRIC. i mean it.
 now, iron it on along the edge of the bottom of the skirt. i have found a dry iron works best for this. the steam makes it not cooperate. once you have it all around the bottom of your skirt piece, go ahead and press up that 1" hem. see how much easier it is to deal with now? no roly poly!

i also added the interfacing to the top edge of my skirt where i will be gathering just to make it easier to deal with. :) but i only cut 1" strips there.

now to hem that skirt. another one of my knit secret weapons is this guy.
a double needle. this not only gives you a more professional look for a hem, it also gives the stitch a little bit of stretch which is needed with the knit fabric. now, if you have never used a double needle before, i highly suggest doing some google research before you try. but once you start using one, you will get hooked! i just wish my sewing machine had a better set up for the 2nd thread so that i didn't have to jerry-rig it with my thread holder in the back. haha. 
just like you would with a regular needle, use a straight stitch to hem and i go ahead and bump up the length to 4.0.
 once you have the hem stitched, it gives you a nice look on the right side of the fabric and an almost zig-zag look to the backside that gives the stretch. now let me tell you how that interfacing just saved your life. if you have a thin knit (i keep typing thin mint...think my belly is trying to tell me something) and try to sew with a double needle with no interfacing...let's just say the sight isn't pretty!


okay - now that we have our knit skirt mini-tutorial done, let's move on to attaching a skirt (knit or woven) to the knit bodice. i will discuss the paper bag skirt later.

you will run a gathering stitch on the top of your skirt portion just as you do in the pattern making sure to gather to the amount of the bodice.
 now, for quite possibly one of my fave tools for sewing knits...clear elastic tape.
seriously, yall...at first i thought of it as just an extra step involved in knits, but TRUST me when i say you will get so much more wear out of your garments if you take the time to add this stuff. truth be told. i have been known to put it in EVERY seam i sew in knits. this stuff is worth its weight in gold. you know how the interfacing adds bulk and stability to the knit? well, this tape adds strength to the knit and comes in especially handy when sewing something like a waistband. i find it helps to protect your knit from the weight of the skirt and it holds up better and helps the knit to keep its shape. have i sold you on this yet? i should probably be a spokesperson. hello dritz, yeah...this is amy. ;) i am a die-hard stretch rite elastic kind of girl, but the dritz clear works just as well and is easier to find in my neck of the woods.

anyways, what you want to do is to place this tape right along the bottom edge of your bodice (this works with the lined tutorial from day 1 as well, i just happened to take photos with this bodice). before you sew it down, stretch it out a few times. this kind of elastic needs to be "broken in" just a bit before it is used. if you have a serger, serge right along the edge not catching the tape in your blade. 
if you don't have a serger, use a zig-zag stitch to sew it down along the edge. i usually sew it to the right side of the fabric, but i honestly don't think there is a right or wrong here. louisa has a few dresses that has it sewn on the wrong side, and it is just fine. someone please alert me if there is a correct/incorrect method to this. :)

once sewn you will realize that you still have stretch to your knit, but it is stronger and more stable. pay no mind that my tensions are off. i could probably stand to clean my serger too, but let's not go there today.
now, place your skirt on your bodice, just as you would in the pattern, pin in place and sew the skirt to your bodice. 
now, since i sew my elastic tape on the right side, i always take about 1/8" of the seam off when i serge the two together.
remove your gathering stitch (i do this always, but it is helpful with knit so that you still have some give to the seams) and take over to the iron and press that seam out. look, you can almost see the strength of that seam now!
pat yourself on the backs ladies...as you have just finished up your knit lazy susans. rock on my dearies!

but wait...don't forget that awesome addition of a paper bag style skirt to lazy susan bodice! i do so LOVE this dress!
i used the taylor pattern by the mean princess. when it came time to add the elastic, i measured my bodice along the bottom edge and saw that it came to 23". 
so, for both of my casings, i cut the elastic at about 23.5" and sewed them together and placed in the casings so that the width of my skirt was the same width as my bodice as shown below.
 now to do some measuring and tinkering since i want to add clear tape to my bodice where i will be sewing it in place. so, with both the bodice and skirt turned inside out, you want to slide the waistband of the skirt into the bodice until the bottom of the bodice lines up with the bottom of the waistband as shown below.
 now, to attach the skirt and bodice, you will be stitching FROM THE RIGHT SIDE along the elastic waistband. i like to stitch along the bottom of the casings and the top of the casings as shown by the arrows.
so, i need to measure how high up from the bottom of my bodice i need to go to determine where to place my clear tape for that top casing seam. for my skirt, the top of the casing falls 1.5" up from the bottom of my bodice. i put a pin in place to make it more clear.
 now, draw a line on the bodice all the way around where the pin is. this is where you will stitch your band of clear tape (just as above, make sure to give it a good stretch first) to the WRONG side of the bodice with a zig-zag stitch.
now, this is completely up to you. you can add another band of clear tape along the bottom of the bodice, but i usually don't because the seam that will get the most abuse is that top one which you just secured your tape to. however, it would certainly be fine if you wanted to!

on a flat surface with skirt and bodice still inside out, place the waistband of the skirt back into the bodice and match up your bodice with the waistband as you did before (ie the top casing and bottom casing) and pin in place. pin until the cows come home in fact.
now, turn your dress right sides out and head over to the machine. with patience, sew along the top of the elastic casing first. i use a straight stitch with a length of 4.0, and stretch just a bit as you sew. this is NOT a time to be speedy mcspeedperson at the machine. take your time, you want this to look awesome.
 once you made it around your top seam, head on down to the bottom of the casing and do the same.
guess what ladies - pat yourselves on the back. you are done. you are well on the way to knocking out some GORGEOUS knit lazy susans in your sewing room.

join me tomorrow for the last day...and don't you know, i saved the best for last...DETAILS!!

Tuesday, July 23, 2013

lazy susan in knit sew along - day 2

sew along objective (yeah, i just did that...i promise i wont bust out an outline): to take your bodice from the lazy susan pattern and learn how to construct it out of knit fabric for a more versatile pattern.

day 2 - flutter trim bodice & drop waist: cutting and bodice construction for knit bodice that is not lined but has "flutter" trim along neck and arms. perfect for thicker knits. and just so stinking cute!

welcome back! i hope you have been having a great time so far! i have really had fun dressing up these lazy susans. i love when you can take one pattern and give it twists so that you end up with a few versatile looks! talk about bang for your buck! i know you girls work hard for your money and i want to get you the most for it! if you are just now joining us, check out this blog to learn about the sew along, and then check out day 1 to see what we are up to.

alright - BEFORE you go cutting. listen to this very important piece of information. these sew alongs work just like my patterns. please read through to the end of the post before you do anything. i promise it will help things to go smoother and make more sense!

now on to some business. just like with the lined bodice we did yesterday, you want to SIZE DOWN. so, grab your pattern pieces and trace off the FRONT bodice piece from the size below what your little one would usually wear. since we are not lining this bodice, we are going to be using the same piece for both the front and the back - so no need for another pattern piece. easy, right? you will be cutting 2 on the fold from the front bodice of the original pattern.

now, if you do not want to drop the waist...carry on below 2 photos. BUT if you do want to drop the waist (i am currently obsessed with drop waists), listen up. :) to figure out how much to drop the bodice, measure your kiddo from the underarm to the top of where you want the waist to be. my model is in the bed getting her "booty seep" (hehe that is what she used to call it) so let me show you on my dress form. as you can tell, i am still learning on how to draw with a mouse.
my measurement was 6.75" roundabouts (this doesn't have to be rocket science). so what you want to do is to measure from the bottom of the underarm curve on the pattern piece down and extend the original bottom of the bodice until you reach your measurement. for instance, with my measurement being 6.75", the bodice already extended 3.25" from the underarm, so i just needed to add an additional 3.5". hope that makes sense. as i said, it really isn't rocket science and i will totally admit that i did another one and i just eyeballed it. :)
now, place your pattern piece on the fabric, pin in place and cut 2 on the fold. remember, just like yesterday, you want the stretch of your fabric running perpendicular to the fold.

once cut, place your bodice pieces right sides together matching up the shoulders and pin ONE shoulder together and sew (3/8" seam allowance). repeat after me, only sew one shoulder. :) also, just a quick reminder - if you are not using a serger, don't forget you need to use your stretch stitch!!
now, take it over to the iron and press out that shoulder seam. then, take your bodice to a flat surface and lay it out so that the neck opening is extended. you want to measure the neck opening as shown below. again, this isn't rocket science and you don't have to be exact, but you certainly want to be in the ballpark.
see, my measurement comes to about 14". this number is going to tell us how to cut the strip to use as the flutter that will also finish off our neck and arms. :) generally the rule of thumb with ruffles/gathers is that you want to go 1.5 to 2 times the amount of the area to be gathered. i like to err on the side of having plenty, so i just go ahead and go with the most generous measurement. so, i am going to double my 14" and cut a strip that is 28" long.

NOW, to give you some options...you can do this flutter trim one of two ways, you can either have a double row of flutters as shown here:
or a single row.
i did both, duh. and i will tell you as nice as the double looks, i actually prefer the single. the double, i fear is going to be too heavy and will pull that neck over time, which makes me sad since i love the dress. it also created a crazy wonky situation in the underarms that i had to jerry-rig so that it was halfway presentable. so, i would say just play around with your knit and try to determine which one you like best. 

so, to pull out our math skills again, if you are doing a double row of flutters, cut your strip:

(length of neck opening * 1.5 or 2) by 1.5" and iron it in half lengthwise

if you are doing a single row of flutters, cut your strip:

(length of neck opening * 1.5 or 2) by 0.75" no ironing needed
now, you may think that 0.75" doesn't seem wide enough, but trust me, it is! i actually cut it 1" the first time and ended up ripping the seams out as the extra fabric created too much weight and weighed down the neck. not cool!

okay...off to gather that strip.

if you have a double flutter - run a gathering stitch along the FOLDED edge of your strip. i know this goes against all of the woven sewing you have done, but you WANT that raw edge to show. thankfully knit doesn't fray and instead will give you a really great textured, fluttered look with the raw edges.

if you have a single flutter - run a gathering stitch along one of the edges. now, i will tell you my little secret, with just one layer - i find it MUCH easier to gather with an elastic bobbin here. that way i don't have to rip out my gathering stitch later and well, let's just face it...it is quicker. if you are not familiar with this technique - do a quick google search. that is how i learned as well, there are some awesome tutorials and you tube videos out there! and if you sew with knit often, you will find yourself gathering with an elastic bobbin often. it is a lifesaver with knits!
 see how pretty and gathered it comes out?
now, if you have gathered with an elastic thread, head over to your iron and hover it and steam the snot out of it and watch it shrink. i swanny, this never gets old for me! it amazes me each and every time. PS - i adore how my iron created a fishbowl effect of my sewing room in the background. i cannot hardly believe it is actually clean too!
steam magic aside, if gathering the old fashioned way, run your gathers (while trying to not lose your mind as the strip wants to coil this way and that) along the strip until you end up around your measurement for the neck opening, or until your desired level of gathers. some people like a ton of gathers, and some don't. honestly, it is up to you. i told you this isn't rocket science but you do want to have enough of the strip to cover your neck opening and you want your gathers consistent.

now, lay your bodice on a flat surface, and place your gathered strip right sides together with the bodice with the gathered edge flush along the opening of the neck as shown below. pin in place. as you can see, i have some fabric strip left over. this is totally fine since i am happy with the amounts of gathers that i have. :)
take this over to your machine, and stitch it down to your bodice neck opening with a 3/8" seam allowance. now, if you didn't use elastic thread - once you have your strip sewn down, you want to make sure to remove your gathering stitch. if not, you will not have the full amount of stretch your knit will allow since that gathering stitch will hold you back and the neck is one place you NEED that for going over the head. :) i know it seems like a silly step, but i always, always, always remove my gathering stitch, even with wovens. once you start, you cannot stop. and since there are methods to my madness, i always gather in a completely different color than what i sew in so that it is easy to differentiate which one to remove.

take the bodice over to the iron and press that flutter trim out. take your time here since this is a detail that you want to look a million bucks!
 just a side note, but my sewing room smells like heaven right now. my friend phoebe got me hooked on these candles from anthropologie (these are all i can afford in that store) and i have yet to meet one that i didn't want to eat. yummy smelling candle in my sewing room make me happy. this is one of the few things i will treat myself to! ps - look at my sweet brown dog as a puppy on his first swim. man i miss that doggie!
once you have your trim pressed, take to a flat surface and with right sides together match up the shoulders of the side that you haven't sewn together, making sure to match up your flutter trim as well. pin in place and sew with 3/8" seam allowance.
 press that seam and now we are going to turn our attention to the armholes. we are going to do the trim on these EXACTLY as we did the neckline. so, start first by measuring and then go to cutting your strips, gathering and attaching. i feel silly repeating all the steps since we just did them, so i wont. ;)

NOTE: if you want to add flutter sleeves in addition to the flutter trim, attach your flutter sleeves to the bodice as you would in the pattern BEFORE you add the flutter trim. That is a whole lot of fluttering going on and Capt. Jack Sparrow isn't even in the room. Oh be still my pirate-loving heart.
 once you have sewn the flutter trims on both armholes and ironed out the seams, match up the armholes right sides together, taking care to match your trim as well (shown below), pin in place and sew down your side seam with 3/8" seam allowance.
guess what ladies...it is about "pat yourself on the back" time. :) 

now for all of you top-stitchers let's get to work on that neckline and those armholes. remember, when you top-stitch on knit, make sure to lengthen your stitch length (i use 4.0 or 4.5) and stretch your fabric as you sew. this ensures that the stitches will stretch some with the knit while going over the head and over arms instead of popping. while top-stitching isn't for everyone, i recommend it for this type of flutter trim, and more for a functional than fashionable. it helps to secure that flutter trim in place so that it doesn't want to roll out. remember, take your time! you want this looking amazing!! photo props to my husband since i have yet to grown that other arm. this is how i stretch as i top-stitch.
and on that note girls...we have completed day 2 of the sew along. i cannot wait to see photos and don't forget to get your "booty seep" and come back tomorrow to learn about attaching skirts to our awesome knit bodices!! remember to post all photos/questions/concerns/tips to the brownie-goose lovers page on facebook!

PS - if you don't already have some of this in your sewing arsenal, you may want to grab some. i find it EXTREMELY beneficial in the sewing room with knits. especially when it comes to attaching skirts and things of that sort. :)